How To Maximize the Potential of Your Joints in Ground Fighting

Your initial response is the key to success in ground fighting. Your first move sets the tone of the fight. It affects what techniques follow and eventually who dominates. Many of the Junsado responses to being pinned or immobilized on the ground rely on your initial movement as a defender.

blog5 (01)For example, when you make your body smaller or draw your limbs into your center, you not only control your body better and conserve energy, but also make yourself less vulnerable by reducing the number of exposed vital targets. As a defender, particularly on the ground, it is critical to draw your knee and elbow closer together toward the center of your body to protect yourself, collect your inner force, and strike powerfully when needed. Bending the large joints and drawing the limbs in toward the center of the body creates three potential advantages: control, range of motion and twisting force.

Control

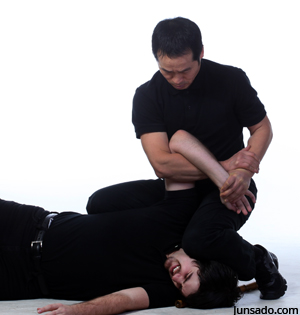
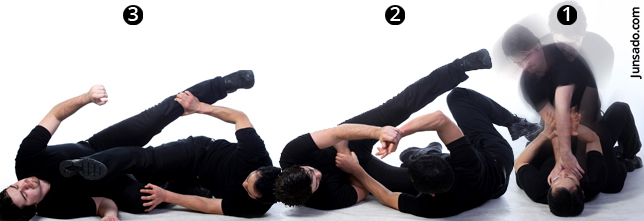
On the ground, keeping your arms bent and close to your body increases your control and reduces the opportunities for your opponent to control you. For example, if you keep your arm straight, your opponent will likely try to lock it or break it (1). When you keep your arms bent, with your elbows close to your body, you not only defend against an arm lock, you put yourself in a strong position for twisting, pulling, pushing, or resisting (2). From this position, you can put your entire body weight into your techniques by using your legs and torso to initiate and follow through without losing control of your body as well as the situation (3).

blog5

Range of Motion

The greater the range of the motion in an arm or leg, the greater force you generate. By bending your knees or elbows, you put yourself in a good starting position for a strike, kick, push or thrusting movement. Bent joints store potential power. For example, when you are flat on your back with your legs outstretched, it is impossible to lift your body more than a few inches off the ground. But if you bend your knee, drawing your foot close to your hip and planting your foot on the ground, you are in a position to powerfully push off the ground and thrust your hip and torso upward. The same is true of your arms. By drawing your arms in close to your torso with your elbows bent, you create the possibility of striking or pushing the opponent over a greater range of motion than if your arms were already partially extended.

blog5 (8b)

 Twisting Force

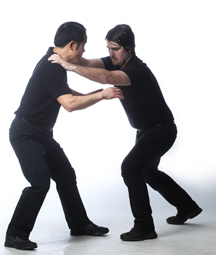
When escaping from a lock, pin or hold, a twisting movement is generally easier to apply than a straight line movement. The same is true of takedowns; it is usually easier to take an opponent down by rotating your own body and whipping the opponent around it than by throwing him straight down. When a takedown utilizes a torquing action, it mitigates the resistance of the major muscles and joints of the opponent’s body and allows you to take him down with less work. In grappling against a bear hug for example, if you try to escape by going straight down or directly forward, it is nearly impossible to be successful, especially when the opponent is stronger than you are.

However, if you lower your body while twisting downward at a fifteen-degree angle, you have a better chance of escaping. By doing so, you create more sensory demands for your opponent to process, increasing his distraction and your control. More importantly, the twisting action often creates a throw or takedown in the direction of his blind spot because the twisting motion produces an angular or diagonal movement trajectory. Taken together, a twisting motion can provide you with pivotal advantages to maximize your potential while mitigating the opponent’s strength.

blog5 (0d)

 Forging Force

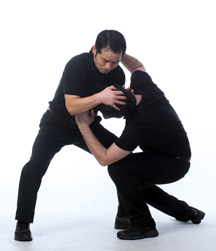
In wrestling against a bigger opponent or untangling a lock on a vulnerable body part, such as the neck, it is useful to use your entire body as leverage. For example, as your opponent chokes your neck with his right arm from the front, it is hard to escape using your hands alone. In this case, you can forge his arm to your body by pulling it down against your upper chest and then twist your torso to manipulate his arm. Since your torso has greater weight behind it, you can generate greater impact on the joint of his arm when you rotate your entire body.

This article is an excerpt from Junsado Fundamentals, Standing and Ground Combat.

Junsado Fundamentals, Standing and Ground Combat ($5.99, over 650 full color photos) is available exclusively in e-book format for Kindle (Amazon.com).

Junsado Defense Against Tackling

Junsado Fundamentals, Standing and Ground Combat is a comprehensive book on fighting, with an emphasis on effectively neutralizing and destroying your opponent in either standing or ground confrontations. Using training scenarios, it presents unconventional defenses against tackles, head locks, chokes, arm locks, punches, grabs, low kicks, sweeps, throws, pins and a variety of strikes.

 Sample standing combat scenario:

Against Tackling

A fighter who attempts to tackle you is either an expert at ground fighting or is very inexperienced. The key to defending against a tackle is to redirect the assailant’s lunging force off your centerline. Once you pivot your body off the centerline, you are less likely to be knocked backward. If your opponent is large and powerful, counterattack to a vulnerable area like the head or neck to disorient him.

 Situation: Lunging for Tackling 

Tackling Defense: Evade – Takedown – Headlock

 How to Defend:

1. As your opponent rushes in to tackle you, put your hands between the two of you and lower your posture.

blog2 photo (1)

2. Grab his hair or the top of his head with one hand and his chin with the other hand.

blog2 photo (2)

3. Use your grip on his head and chin to steer his body in the direction he is moving until you have solid control over his head. Then swiftly pivot your body away from him to spin him down to the ground.

blog2 photo (3)

4. As he falls, maintain your hold on his chin and head, flexibly adapting to the changing intensity of his fall.

blog2 photo (4)

5. When he lands, kneel on one knee behind him and secure his head in your arms.

blog2 photo (5)

6. Tilt his head downward to intensify pain in the neck and reduce his opportunities to strike you with his hands or feet.

blog2 photo (6)

Caution: This head twist is extremely dangerous and can cause damage to the cervical spine in the neck. Use caution when practicing this with a partner, never applying the twist forcefully in practice, and only use this technique in self-defense when justified.

 Key Points:

When the opponent pushes you, pull his body in the direction he is already propelling himself. This will confuse and distract him. Then as you move your body out of the line of his attack, lower your stance and change the trajectory of the force. His body will continue moving as you yank his head in a different direction, causing him to fall. It is important to apply the headlock as soon as he lands, before he orients himself and recovers his balance to mount a counterattack.

The scenarios presented in Junsado Fundamentals, Standing and Ground Combat  are offered as examples of how to use Junsado skills in actual combat, but they aren’t meant to cover every possible action or reaction that could occur in a fighting situation. They’re simply intended to be used as a method of arranged practice to facilitate learning the fundamental skills. As you repeatedly practice scenarios like the example above, your body will adapt and internalize the skills, making them your own. Once you’ve mastered the practice scenarios, your goal is to move on to free practice, applying the skills in increasingly less structured situations so you can use them at will.

The above instruction is an excerpt from Junsado Fundamentals, Standing and Ground Combat.

Junsado Fundamentals, Standing and Ground Combat ($5.99, over 650 full color photos) is available exclusively in e-book format for Kindle (Amazon.com)Android (Google Play store)Nook (Barnes & Noble), and iPad (Apple Store).

Self-defense: The 5 Stages of a Confrontation

I am a lifetime marital artist and former combat instructor in Special Forces. I have developed, written and taught combat and self defense courses around the world to more than 100,000 students and instructors. Even after more than 35 years of experience in martial arts training and combat survival experiences, every time I enter an unknown environment, I always question myself on “What if…”

No matter how experienced you are in the martial arts or how confident you feel in defending yourself, awareness is a far more powerful weapon than any other skills you practice in the training hall. Don’t be an easy prey. Watch for signs that signal danger during the following stages of interacting with a potential assailant.

Stage#1: Approaching

Approaching is the first sign of potential danger. An assailant may walk toward you casually, follow you from behind or jump out of nowhere. This is the time for you to prepare for avoiding the assailant or running away.

Remember: Don’t Run Away from Danger; Run to Safety. You don’t need to beat or defeat an assailant – there are no winners in self-defense. Your only goal is to escape safely.

keytec1

Stage#2: Closing

If you feel even slightly uncomfortable about a person approaching you, do not allow the assailant to get closer than 5-6 feet. If necessary, give a stern verbal warning such as “Stop there” or “Don’t come any closer.” Continue reading

Take Control with Wrist Locks

Wrist locks are the most useful techniques in subduing your opponent. Often you may encounter situations in which you cannot throw kicks or punches at all but you must take the other party under control. Wrist manipulation is one of the ultimate methods in subduing and controlling locks. Since the wrist is full of vital points, once you know how to do the techniques properly, you can take complete control of attackers without causing permanent damage. Wrist locks are especially good for law enforcement officers.

Junsado Wristlock Sang H. Kim

There are four ways of controlling the wrist: straight, reverse, lateral, and hooking angles. There are four ways of controlling the direction of you and your opponent’s movement: forward, backward, lateral, and spiral paths. Whether you manipulate the wrist in a standing position or on the ground, you can apply the same principles to subdue your opponent.

Wristlock3 Junsado Sang H

You need to develop strength of your thumb and fingers along with your forearm muscles in order to be effective. You can develop them by specific training methods such as weight training and sand bag pressing.

Arresting Locks and Compliance Holds

Arresting techniques are very different from the usual fighting techniques that you use against an opponent. When you compete or fight for self-defense you and your opponent are on equal footing. However, in arresting, you cannot be in equal to your opponent. You should always be one or two steps ahead in thinking and positioning. You should be able to move in properly before your counterpart figures out what your next move is. By the time your opponent realizes what you are doing, you should already been in control of him.

power2

The knowledge of arresting locks opens up a new insight into the vulnerability of the techniques that your opponent might use. When you know arresting locks, you can take control of the situation no matter what an attacker might throw at you. They also enable you to take immediate control of your attacker’s weapon if necessary and use it against him.

There are three positions that you want to move into to arrest your counterpart: behind him, on the side of him, or take him to the ground while you remain upright. Once you secure one of these positions you should be able to control his joints in various ways so that you don’t lose control over him until you have completely immobilized him.

Arresting locks are effectively applied to both empty handed attackers and armed attackers. Since the arresting locks are geared to manipulating the body into inescapable positions, once you know how to do the techniques properly, you can take complete control of attackers without causing permanent damage.

Here are a few suggestions to enhance your knowledge of locking up your opponent with ease. Continue reading

Joong Bong: Short Stick Fundamentals

The Joongbong, or short stick, is the most versatile and easy to learn weapon. Once mastered, the principles of the Joongbong can be applied to any blunt weapon. The most comfortable length for the Joongbong is the length of your arm from the armpit to the middle fingertip when you stretch your arm out with your fingers fully open.

Grip the Joongbong approximately one to two inches above the end. The tip of the Joongbong aims at the eyes or the Adam’s apple of the opponent with your arm at almost a 90 degree angle to the Joongbong.

Junsado Joong Bong Sang H Kim

There are five different blocks: high, cross, inside, outside, and low block. There are five offense skills: straight strike, thrust, inside cut, outside cut, and cross cuts. There are five footwork: forward, backward, two lateral steps, and turn step.

Joongbong Fundamentals include stances, grip, footwork, offensive skills, defensive skills, and the correct way to evade, cut, strike, thrust and block with the Joongbong against an opponent. Sang H. Kim thoroughly explains every step of the training as you follow along.

Joongbong Patterns are three forms of Joongbong combat with applications and step by step explanation. Beginning from the most basic skills introduced in Joongbong Fundamentals, you will learn how to integrate your techniques into a flowing pattern of offense and defense. Each new pattern introduces increasingly difficult combinations of footwork, attack and defense to upgrade and refine your weapon skills.

Ssang Bong: Double Stick Fundamentals

Ssang Bong literally means double (ssang) stick (bong). There is a time and a situation for use of two weapons, particularly when encountering multiple opponents. You can also practice the double sticks against a solo opponent striking multiple targets simultaneously. You should not favor either of the sticks since, if you do, you will be distracted by your own thoughts of two weapons. Treat them like one set of weapons working together as the two wheels of a cart carry a wagon. Offense and defense should seamlessly flow into another offense and defense.

Ssangbong3 Junsado Sang H Kim

BASICS:

The primary stick should be held firmly in your dominant hand; the secondary stick in the other hand. In a non-combat situation, hold both sticks in your non-dominant hand in a natural stance. There are less than dozen different postures for situations arising: ready posture, middle offense posture, middle guard posture, low defense posture, high defense posture, high low posture, high side posture, side open posture (high-side), frontal open posture (high-low), combat posture (normal fighting position).

DEFENSE:

For defense, the primary hand moves for high, low, inside, and outside blocks; the secondary hand supports the primary hand by executing inside, outside (reverse), and chop blocks. When the primary weapon creates an opening the secondary penetrates further, and then the primary completes the destruction.

OFFENSE:

Offensive techniques include strike, thrust (straight and reverse), inside cut and outside cut. Targets are the head, eyes, temple, ear, nose, neck, wrist, arm, torso, and legs. Continue reading

Jang Bong: Long Stick Fundamentals

The Jang Bong is a long stick, approximately 60 inches in length (practically your height length). It can be used to defend against an empty handed or armed attacker with ease from medium and long distance.

FUNDAMENTALS:

Jang Bong fundamentals include two basic grips (for long and close range fighting), stances, 10 basic blocks, and basic offensive movements including straight striking, circular striking, hooking, thrusting, scooping and controlling techniques, and 8 Circular Drills as well as proper warm-up, knowledge of targets.

FORMS:

There are 8 Jang Bong Forms in Junsado: Jang Bong Il Hyung, Jang Bong Ee Hyung, Jang Bong Sam Hyung, Form of Change, Form of Circle, Form of Iron, Form of Mind, Form of Void.

jangbong fundamentalCHARACTERISTICS OF FORMS:

The foremost element of each form is effectiveness in handling the weapon. Techniques utilized in the forms include thrusting, striking, blocking, scooping, side turn and spinning movements, combined with simple techniques for offensive and defensive tactics. Each form has a unique emphasis such as centering, leverage, adaptation, versatility, and coordination of the body and weapon.

CENTERING:

Good centering means good control of the weapon and proper distribution of power. Powerful impact comes from smooth transitions and precise aim. Continue reading

Developing Speed for Martial Arts Training

This article is an excerpt from the book Ultimate Fitness through Martial Arts

To develop overall speed, there are several sequential steps in training:

  1. Basic conditioning
  2. Explosive power development
  3. Skill refinement
  4. Skill loading
  5. Full speed training

Basic condition, including flexibility, strength and agility training, is a prerequisite for speed training. The completion of basic conditioning is signaled by a level of fitness that allows the athlete to begin the more intensive exercises that develop explosive power. Exercises for developing explosive power are detailed in “Chapter 2: Power” and the execution speed section of this chapter. Once the target muscles start to develop, begin working on skill refinement. Each skill should be examined to eliminate unnecessary movements and increase biomechanical efficiency.

speed

With highly refined movements and strong muscles, you can begin adding speed to each movement. Start skill loading gradually and observe your body’s reaction. If you can add speed and still maintain semi-refined movements, continue to increase your intensity. Eventually you will reach the final stage of speed training in which you can execute skillful movements at high speed.

Now let’s examine the four types of speed individually. Continue reading

Junsado Fundamentals

jsd basic 5 stages 500x200

Five Stages of Movement

Every movement in Junsado goes through five different stages in a simple flow :

1. Preparation
2. Execution
3. Impact
4. Follow through
5. Finish & Repose.

Your stance, footwork, mobility, hand skills, kicking skills, and joint immobilization skills are critical for combat preparation. (For details, refer to the book Combat Strategy – Junsado: The Way of The Warrior.)

jsd basics

Junsado Basics

1. Stance is divided into two fundamental types: full stance and half stance.

2. Hand skills areclassified in two types: open and closed.

3. Elbow techniques are linear and circular.

4. Take-down techniques are static and dynamic.

5. Joint locks are standing immobilization and ground pinion.

6. Footwork is classified in two ways: offensive and defensive.